Whether you work from home or want to show an achievement from the game you’re playing, the screenshot function has become vital to those with Windows 10. While there are some standard shortcuts on the operating system, there may be some you’re not aware of.
Here’s a quick look at how to screenshot on Windows 10 and how to use each of them. I’ll also show you which one I have a preference for and why.
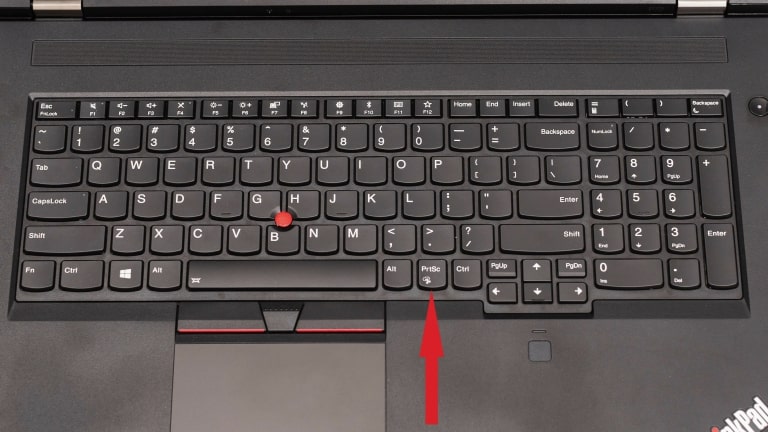
The Infamous Print Screen function
The first screenshot option for Windows 10 I want to introduce you to is the Print Screen button. Surely, you know this one by now. However, it’s the skill of mastering how to use it that’s essential. Here are some tips for combinations you can try:
- PrtSc on its own: this takes a screenshot on Windows 10 of the entire screen
- Alt + PrtSc: takes a snapshot of the window that’s open on your screen, but you need to paste the contents onto another app to save it, like Paint or Photoshop
- Windows + PrtSc: carried over from Windows 8, saving a PNG file to your default picture folder
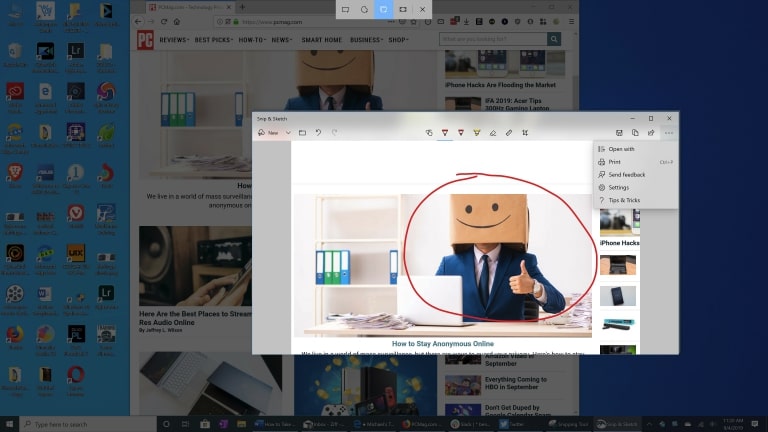
Snip & Sketch
Did you know that Windows 10 comes with a Snip & Sketch function? Basically, you hold Shift-Windows-S to take a screenshot. When you see a message appear saying that it’s been saved to the clipboard, you click on it. This action will open the Snip & Sketch tool. You’ll be able to crop, resize, edit, and save the image in a chosen folder.
If the option doesn’t work for you, it means it’s disabled on your device. Here’s how you can enable Snip & Sketch on Windows 10:
- Open Windows Settings
- Select Ease of Access
- Click on Keyboard
- Select Use the PrtSc Button to Open Screen Snipping
- Restart Windows
If you don’t like having it as your default screenshot tool on Windows 10, you can disable it in the same way.
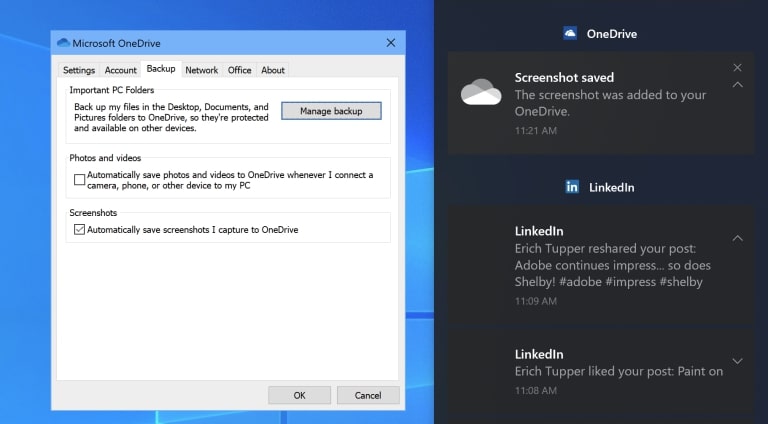
OneDrive
Here’s another app that uses the PrtScr function, but you’ll need to enable it in the settings. Once you do so, it will save the images to your OneDrive on the cloud. You’ll be able to access it whenever you want, especially when using apps like OneNote.
There’s a catch, though. It will use your storage space on the cloud, which means you’ll need to delete some screenshots or pay to upgrade the storage when it becomes full.
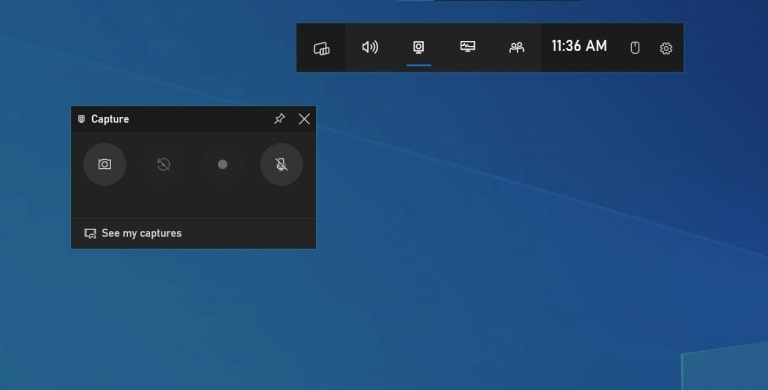
Windows Game Bar
Here’s my favorite built-in Windows 10 and Windows 11 screenshot tool. When you press Windows+G, the Game Bar opens with a plethora of tools. Not only can you take a shot of your screen, but you can record with or without audio. It’s one of the top ways to record your gaming, but it could improve with a live streaming feature so that we don’t have to rely on other apps. You can even indicate in which folder you want all your recordings.
Third-party apps
While I don’t really recommend this method since there are so many Windows 10 tools already, many people turn to this option. There are tons of third-party tools that let you take screenshots and then edit them. SnagIt is probably one of the most popular ones.
Thank you for being a Ghacks reader. The post How to Screenshot on Windows 10 appeared first on gHacks Technology News.


![Razer Cortex crashing games on PC [Fix]](https://lh3.googleusercontent.com/blogger_img_proxy/AEn0k_vdNaCM4w_tQMqy5gemSagy6DyANXyN0zrzXYNxK1Qb4jcWLxK4QvOc7KRsW1yrypkvF9fUIva3FNeJXP1mkoBe5-72QrGgNqoJPE9UQCMTu58tjWPOnfR2V0Gc7umVf-SdEnViKKCgL2fxtkzZEiqmQBo_WQMRDeVDYCgOZVzQI0Ts=w680)
![DeepSeek Verification code not received [Fix]](https://lh3.googleusercontent.com/blogger_img_proxy/AEn0k_tQ5KENJHCKNWHZvKbTi2kOiqJD84pVaTY0vZcC5Z1oOjRV-ZzcHFow-2iaMyVPCQB0YGRIPHEYnP_ABc9NwFazSXCt8HToUed9IMIUWXBB1JxTCymwwkl-cdsgISebB17pEnqajDrI3Zh_LY1UwmaZz9p-ozR-OTE4YTd8E1FGld_79qQQzUoizKP3JA=w680)


0 Commentaires